When Fotomoto runs on your web page, each image it finds is assigned to the default "Collection" in the Fotomoto Dashboard (see below) which controls how/whether the image is available for sale. Every new Fotomoto account comes with three Collections: "For Sale", "Share Only" and "Not For Sale".
Set up products
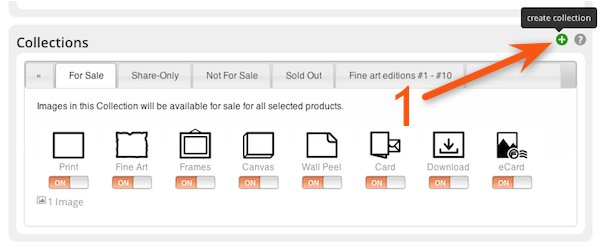
- Log in to your Fotomoto Dashboard and click the Store tab at the top, then scroll down to Collections section.
- Turn products on or off in the For Sale Collection, then click the product icon to change product and pricing options.
Please make sure your source image files are large enough for the print sizes you offer - see
How to calculate the biggest print sizes you should sell for instructions.
Be sure to see our Print size options article to learn how our system handles pricing for images at different aspect ratios.
Add Collections as needed
We recommend using the For Sale Collection to control how the majority of your images are sold. If you need to make some images available differently (different prices, print sizes, etc.), you can upgrade your subscription plan as explained in How to choose a Subscription Plan. You'll get two more Collections on the Pro plan, and an unlimited number of Collections with Pro Plus.
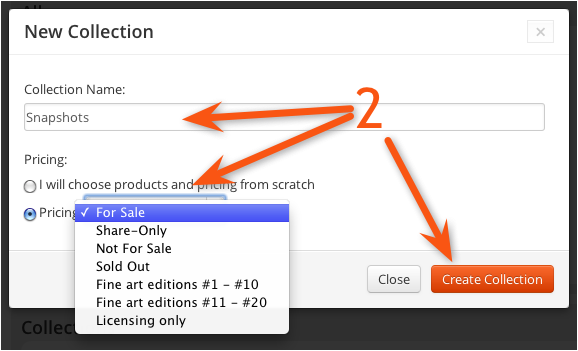
For example, say you sell most of your images at a higher price, but want to sell others as less-expensive "snapshots"...you'd put your fine art images in For Sale, then follow these steps to create a new Collection for the snapshots and set the pricing lower in that Collection.
- Click the "Add New Collection" button
- Give the collection a meaningful name ("Snapshots" for example), choose whether or not you want to copy the pricing from another Collection, then click the "Create Collection" button.
- Set up products for the new Collection as explained above and add more Collections as needed to manage your store. Pro subscribers will have an additional two collections, and Pro Plus subscribers can add any number of Collections.
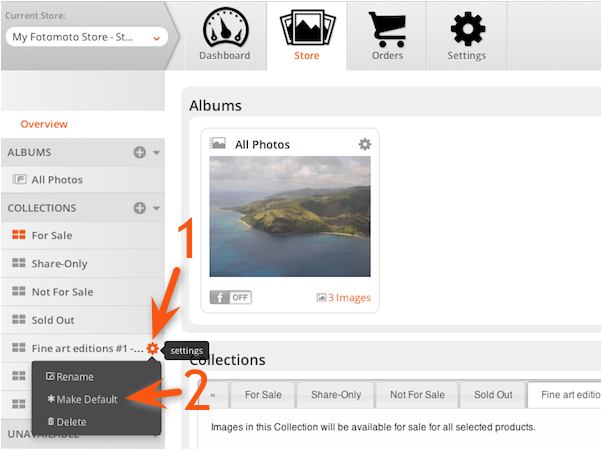
Set your Default Collection
Any new image added to your website (see How Fotomoto works on your site) will go in to the Default Collection, indicated by the orange Collections icon. You can change the Default Collection as you prefer. For example, if you don't want new images added to your site to be for sale, you could set your Default Collection to "Not for Sale".
To change the Default Collection:
- Click the settings icon next to the Collection you want to be the default.
- Choose "Make Default" in the drop-down menu.
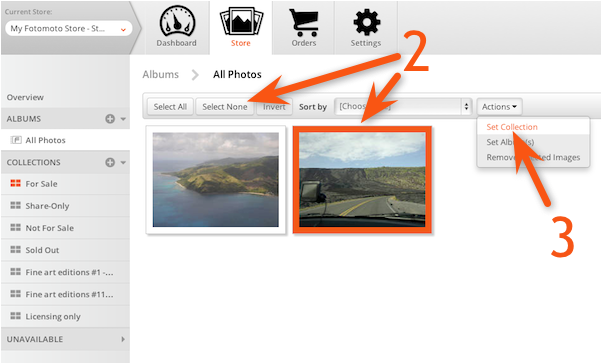
Move your images into other Collections
- On the Store tab, click the desired Collection that contains the desired image(s). The All Photos Album contains every image in your Dashboard.
- Click the thumbnail(s) for images you want to move, or use the buttons in the toolbar to select all images, no images, or invert your current selection.
- Click the Actions drop down menu, click Set Collection, then choose the desired Collection and click OK.

You're Done!